Projects
Donate
Comments
- Anonymous
This is so excellent, thank you so much for providing this information!
- Craig Stephens
Thank you for the great vidoes! I look forward to the completed suit!
Faraday Suit
Welcome to the faraday suit page. This is where I'll be describing to you the entire process of creating a faraday suit. I decided to put up this page and build this suit originally for you guys. Years ago when I was still new to coiling I remember seeing pictures of people in at that time faraday cages. I had always wanted to build one but felt I never had enough knowledge to build and operate one safely. When I went online to obtain the required information to build one, there was none to be found. It seems this is still the case these days. Go ahead and search for it, I challenge you to find clear documentation on building one of these devices for Tesla coil use.
Now I'm sure some of you are thinking, "It's such a simple concept" which it is, but to someone like myself years ago, who didn't understand the physics behind it would be discouraged on account of the unknown. This page then serves to properly document not only the physical construction, but also the theory and practice (safe practice) of a faraday suit to finally put some of your questions to rest. To begin, lets talk about what a faraday cage is and why the concept is completely mislabeled when it comes to these suits.
The Faraday Cage
The Faraday cage is a electrical phenomenon of conductors discovered by Michael Faraday in 1836. It is a property of an enclosed conductor that says that if the conductor is placed in an electric field, charges will be distributed along the outside of that conductor that will in effect create an opposing field within the conductor that cancels the external field leaving the inside of the conductor empty of any electrical field. As you can see from the animated picture below, first the enclosed conductor is introduced to an electric field. Charge separation then begins within the conductor. As charges accumulate on opposite sides of the conductor, a new field 180 degrees off the external field is generated within the conductor that cancels the external field leaving the potential within the cage at 0.
Now lets talk about electromagnetic radiation. If we construct a faraday cage from a mesh type metal material and stand inside with our cell phone, it will in fact block any transmissions into or out of the cage assuming the cage meets a certain requirement. The mesh material must have small enough holes to effectively block the wavelength of the radiation attempting to penetrate the cage. The cage itself is also grounded in order to dissipate any current created.
The quote unquote Faraday suit
So now lets actually discuss the practical uses in the Tesla coiling world. Today, people everywhere are building faraday cages and suits for use with Tesla coils. Ironically they technically have nothing to do with a true faraday cage in terms of personal safety, and have instead been mistermed out of convenience.
The Faraday effect is coming into play while wearing a Faraday suit in that the RF generated by the coil is not present inside the suit. That, however is not the relevant part for the person inside. Since ~100kHZ radiation has no meaningful effect on humans it is the actual current in the discharge, not the radiation, that we are trying to protect ourselves from. That current needs to be directed around the body. The skin effect applies more to metal conductors than people. There are several studies that suggest our nervous system is the primary conductor of current at TC frequencies, not our skin.
Regardless, the main current path in a Faraday suit is through the chain link, not the person. However, the very nature of chain mail is that it has many individual connections, dynamic impedance, and is in physical contact with your skin in many different places. This almost certainly results in your body being in parallel with the chainmail conductor at several points. Of course, your body has a very high impedance compared to the chain mail, so it will carry a much smaller current than the chain mail. In summary, the chainmail acts as low impedance path to ground for current to flow.
Building a "Faraday suit"
The construction of a "Faraday suit" is actually very straight forward. It essentially consists of complete metal cage surrounding your body. Now whether that cage is made of chainmail of aluminum foil, either will essentially work. Now I dont recommend wrapping yourself in aluminum foil and standing in front of a Tesla coil, Im simply using this as an example. Remember, the suit just acts a low impedance path to ground. Now as far as how to actually build one there are several different approaches, but I would recommend one in which there are no points of failure.
In my most recent experience inside ArcAttacks faraday suit my gloves were poorly attached to the chainmail suit. This caused a few gaps in the suit which occasionally gave me a short jolt from the coil. Not painful but it makes you jump. This is potentially the case with larger faraday cages. Dont go sticking your hands outside the cage. This is why I recommend a suit in which accidents cant happen. Well, accidents are somewhat preventable. Remember this is a stunt which is inherently dangerous. Imagine if you had faraday bird cage with a volunteer from your audience who appeared calm and collected but had a panic attack during your demonstration and managed to stand up putting their hands outside the cage before you had a chance to kill the power. With a one piece chainmail suit I feel more comfortable knowing there are less points of failure. Lets get started building some chainmail.
Faraday Suit Series

|
This first video simply introduces what we're going to be doing and talking about over the next few months. I explain some of the things already said above including my reasons for actually making this video series. |

|
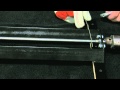
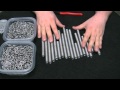
In this next video, I start talking about the tools and materials required to actually make the chainmail. I also introduce the winding rig I quickly built to create the chainmail. I talk very briefly about where I purchase all my materials and I start to explain how the winding rig works. |
|
In this third video I take a step back and show you the process of winding the steel wire into rings. I realized after my last video that it would be pointless to have this page if I was ambiguous in my explanations. |
|
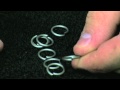
Now that we have wound the wire into springs it's time to actually create the individual rings. This video shows how to cut the springs and then bend the newly formed rings into their closed and opened variety. |
|
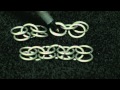
This crucial video shows that actual weaving process. I show you how to create what are called 4-in-1's and how to properly (with multiple attempts) align and connect these into the final product. |

|
In this video, I take the chainmail operation on the road to Raleigh where I sucker some of my friends into helping me. Many of these people have been crucial parts of Teslamad behind the scenes for many years. Hopefully you'll be seeing them again here in other projects. |

|
Happy new year everyone! It's been awhile since a video has been uploaded and we've made a lot of progress. We're now almost finished with the left sleeve, however some problems have arisen. If you have run into the same issue and have a solution please email us! |
|
In this video I just update you on the status of the faraday suit. For the past month or so I've just been working through the spool of wire instead of trying to weave the suit. |
News
Added TCML "You know you're a coiler when" list.
Visit here...
02/21/14
New TESLAMAD - MECHA partnership.
Visit here...
News Archives
Looking for an old event? Visit the archives below.
Visit here...